How To Fix "Could Not Restore Theme" In Blogger Blogspot.
Hi my lovely Bloggers, we are here together again. I am preparing this insightful article to see you through for the failure entering when you want to upload external or third-party blogger template in your blog just to meet your style UI.
With no wasting of time let's dive into the process of fixing the error report known as "Could Not Restore Theme" but before then let's understand these two words "THEME" and "XML" as well how they are working together.
1. What Is THEME?
The word THEME in Blogger (Blogspot), is a pre-designed template that determines the visual appearance and layout of your blog. Like I said earlier, so themes include various elements like fonts, colors, background images, and the arrangement of posts, pages, and widgets. You can choose from a variety of free and premium themes available within Blogger or from third-party designers, allowing you to customize the look and feel of your blog to match your style and brand. Just like that.
2. What Is XML?
XML (Extensible Markup Language) in Blogger is used to define and structure the themes and templates as a file. Therefore XML file contains the layout, style, and design settings of the blog, including the arrangement of widgets, colors, fonts, and other visual elements.
3. What Is The Relationship With Between THEME And XML?
There's a great relationship between a theme and XML in Blogger. this relationship is that the theme's structure, design, and layout are defined and controlled by an XML file. While XML file contains the code that specifies how the various elements of the theme should be displayed, including the arrangement of posts, pages, widgets, colors, fonts, and other visual components.
Therefore when you customize or apply a theme in Blogger, essentially you're working with the underlying XML file that dictates the theme's functionality and appearance. So for the editing the XML file allows for more advanced customization and fine-tuning of the theme's design beyond the standard customization options that are available in the Blogger interface.
What's a wonderful information! We are full of access to dive into the process of fixing it to make sure that and XML Upload Failed can be fixed and we get our desired design.
Following the below screenshot of the Step-by-Step Guide;
STEP 1:
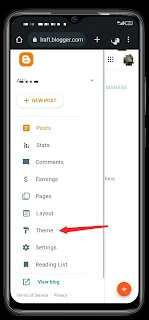
Open you're Blogger Dashboard and click on the Slide Menu button. See example from the below screenshot.
STEP 2:
Scroll down and click on THEME. See example from the below screenshot.
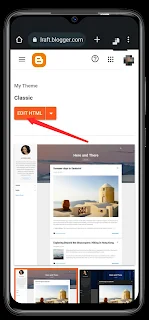
In Theme page see two orange buttons, the first one is a Customize button and the second one is a Drop-down menu button.
In the drop-down menu option click on the "Switch To Second Generation Layouts Theme". See example from the below screenshot.
In the dialogue menu if your blog is not new blog Click the BACKUP AND SWITCH option, but if your blog is new that means you haven't restored and design theme before so you can select SWITCH WITHOUT A BACKUP option. See example from the screenshot below.
If you were chosen the Backup and switch option then something like this will show in the next page the theme will be downloading like I indicate with the circle drawing, so then click on the SWITCH orange text. See example from the below screenshot.
After all that then everything will be change to this way, you may not understand the interface immediately except you're expert in this process to continue click the same drop-down menu button behind the EDIT HTML button. See example from the below screenshot.
STEP 8:
In the drop-down menu options click the "Change NavBar". See example from the below screenshot.
STEP 9:
Click the Drop-down button in the dialogue and select OFF to hide the NavBar. Note even if your default setting was in OFF still click the Off and save it, else it won't work. See example from the below screenshots.
Now click on the EDIT HTML orange button button to edit your HTML code. See example from the below screenshot.
STEP 11:
Now the blog HTML code has now Open for editing, so you don't have to change anything here but to select all the codes and delete it out.
11a:
To do this if you're using PC device use Control+A to select all and delete. If you're using Smartphone device in your Browser go to Menu by clicking the side Menu button.
See example from the below screenshot.
11b:
Then scroll down switch your browser Mode to Desktop site mode. See example in the below screenshot.
STEP 12:
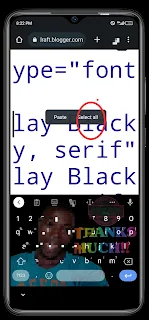
After your browser finished reloading the page to switch to desktop mode, then you'll be able to select all the codes in the HTML box, so press and Hold for some seconds a toast will pop-up with to optionsjor sometimes more than two - then click on SELECT ALL. See example from the below screenshot.
After everything will do like this then open the XML that you wanted to restore, after you click on the file in your folder or Files Manager it'll Open and show you the codes that is inside the XML file so copy all the codes and paste it in this empty XML.
See example from the below..
Conclusion:
As well Bloggers can edit the XML file to customize their blog's appearance and functionality beyond the standard options provided by the Blogger interface.
Today's tutorial has been so insightful, and that it’s going to help you avoid some of the early mistakes in technologically challenged. If you want us to expand on any of the points discussed here, feel free to submit your questions or suggestions in the comment section below.
Follow Us Facebook, WhatsApp, Telegram Channel, Twitter, Watch Us On YouTube For Updated Post. Kudos


